Choosing the Right Time to Repot
Repotting your indoor plants at the right time is crucial for minimizing stress and ensuring healthy growth. In the United States, most indoor plants thrive when repotted during their active growing season, which typically falls in spring or early summer. Plants are more resilient during this period, making it easier for them to recover from the disruption of being moved. Watch for signals from your plant—roots growing out of drainage holes, water running straight through the pot, or slowed growth all suggest its time for a new home. Avoid repotting during winter when most plants enter dormancy, as they have less energy to adapt to change. By understanding these seasonal cues and paying attention to your plants behavior, you can choose the optimal moment to repot and keep your green friends happy and healthy.
2. Gathering the Essentials
If you want to repot your indoor plants without causing them unnecessary stress, preparation is key. Having the right tools and materials ready before you start will make the process smoother and more comfortable for both you and your green friends. Here’s a handy checklist to ensure you’re fully equipped for a successful repotting session.
Checklist for a Smooth Repotting Experience
| Item | Purpose | Tips |
|---|---|---|
| Pots (with drainage holes) | Provides space for roots to grow; prevents waterlogging | Choose a pot 1-2 inches larger in diameter than the current one |
| Potting Soil | Offers nutrients and proper aeration | Select soil tailored to your plant type (e.g., cactus mix, orchid bark) |
| Trowel or Small Shovel | Makes transferring soil easier and cleaner | A hand trowel is perfect for small to medium pots |
| Gloves | Protects your hands from dirt and possible irritants | Nitrile or cotton gloves work well for most indoor plants |
| Watering Can or Spray Bottle | Keeps roots moist during transfer and helps settle new soil | Use lukewarm water to avoid shocking the roots |
| Old Newspaper or Drop Cloth | Keeps your workspace tidy and makes cleanup easy | Spread under your work area to catch any spills |
| Sterilized Scissors or Pruners | Trims away dead or damaged roots safely | Sterilize with rubbing alcohol before use to prevent disease spread |
| Masks (optional) | Protects from inhaling dust, especially with dry soils or sensitive allergies | Recommended if working indoors in tight spaces or with dusty materials |
Why These Essentials Matter
The right combination of supplies ensures that your plant transitions smoothly into its new home. Pots with drainage holes prevent root rot, while species-appropriate soil supports healthy growth. Protective gear like gloves and masks not only keep you clean but also shield you from potential allergens. Taking time to gather these essentials will turn repotting into a positive experience for everyone involved—especially your plants!

3. Preparing Your Plant and Workspace
Before you start repotting, a little prep goes a long way in keeping your indoor plants happy and your home clean—especially if you’re working in a small apartment. Here’s a step-by-step guide to get both your plant and workspace ready for a stress-free repotting experience.
Gather Your Supplies
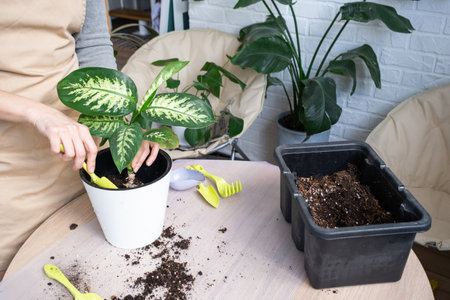
First, collect all the tools you’ll need: fresh potting mix suited for your plant, a new pot with drainage holes, gloves, a trowel or spoon, and some old newspapers or a plastic sheet to catch any mess. Having everything at arm’s reach helps avoid scrambling mid-process.
Prep Your Workspace
Protect Surfaces
If you don’t have outdoor space, clear off a kitchen table, countertop, or even the floor. Lay down newspapers, an old shower curtain liner, or a silicone mat to protect against spills and make cleanup easy.
Contain the Mess
If you’re short on space, repot inside a large storage bin or use a cardboard box as a work area—this keeps soil from scattering everywhere and makes tossing out debris simple.
Prepare Your Plant
Water Before Repotting
Water your plant lightly about an hour before repotting. This softens the root ball and helps minimize root shock when transferring to its new home.
Loosen the Roots
Gently remove the plant from its current pot by tipping it sideways and tapping the base. Tease apart tangled roots with your fingers—if they’re tightly bound, make small cuts with sterilized scissors to encourage healthy new growth.
Quick Tip for Apartment Dwellers
If you’re worried about lingering dirt or odors indoors, keep a damp cloth nearby for quick wipe-downs and have your trash can close so you can immediately dispose of old soil and leaves.
With these steps, you’ll set yourself (and your plant!) up for success, no matter how tight your living quarters may be.
4. The Repotting Process: Step by Step
Repotting your indoor plants doesn’t have to be stressful—for you or your green friends. Follow these easy-to-understand steps to safely move your plant into a new pot with minimal shock. Take your time and handle each stage gently for the best results.
Step 1: Prepare Your Workspace
Lay down newspaper or a plastic sheet to catch any spilled soil. Have your tools, fresh potting mix, and the new pot ready so everything is within reach.
Step 2: Remove the Plant Safely
- Water the plant lightly a few hours before repotting; this softens the soil and makes removal easier.
- Gently tip the pot sideways while supporting the plant at its base.
- Tug softly on the base of the stem, not the leaves, while squeezing or tapping the sides of the pot if needed.
- If stubborn, use a butter knife around the inner edge of the pot to loosen roots.
Step 3: Inspect and Detangle Roots
Once out of its old home, check for root health. Healthy roots are white or light tan and firm, while dead roots look brown, mushy, or dry.
| Root Condition | What To Do |
|---|---|
| Healthy Roots | Leave as is or gently loosen if circling |
| Crowded/Circling Roots | Gently tease apart with fingers; trim if necessary |
| Rotten/Dead Roots | Snip off with sterilized scissors |
Step 4: Place in Its New Home
- Add fresh potting mix to the bottom of the new pot (about one-third full).
- Sit your plant in the center at the same depth it was growing before.
- Fill around the roots with more soil, pressing gently to eliminate air pockets but not packing too tightly.
- Leave about an inch of space from the rim for easy watering.
Step 5: Water and Settle In
Water thoroughly until excess drains out. Place your newly potted plant in indirect light for a few days to help it recover from transplant shock. Don’t fertilize right away—wait a couple of weeks before feeding to let roots settle in their new home.
5. Aftercare: Helping Your Plant Settle In
Once your indoor plant is comfortably nestled in its new pot, aftercare is crucial for a smooth transition and quick recovery. First, hold off on heavy watering right away. Instead, give your plant a light drink to moisten the fresh soil but avoid soaking it—overwatering can stress roots that are already adjusting. Next, be mindful of lighting. Keep your repotted plant in a spot with indirect sunlight for a week or two; direct sun can be harsh while the roots recover. It’s normal for your plant to look a little droopy or stressed after repotting, so don’t panic if it doesn’t bounce back instantly. Avoid fertilizing for at least a month, as the new soil likely has enough nutrients and adding more can overwhelm sensitive roots. Lastly, resist the urge to move your plant around too much during this period—let it acclimate in one stable location. With patience and gentle care, your plant will soon perk up and start thriving in its fresh home.
6. Common Mistakes to Avoid
Repotting indoor plants is a key part of keeping them healthy, but it’s easy to make mistakes if you’re new to the process. Here’s a rundown of some frequent errors and how you can steer clear of them:
Choosing the Wrong Pot Size
Many people think bigger is always better, but moving your plant into a pot that’s too large can actually harm its roots and lead to overwatering. Always select a pot that is just one or two inches wider in diameter than the current one.
Poor Soil Selection
Using garden soil or old potting mix might seem convenient, but it often lacks proper drainage and nutrients. Opt for a fresh, high-quality potting mix suited for your specific type of plant—cacti, succulents, and tropicals all have different needs.
Skipping Drainage
A common error is repotting into containers without drainage holes. Without proper drainage, water can accumulate at the bottom and cause root rot. Always use pots with drainage holes, or add a layer of gravel at the bottom if you must use a decorative pot.
Disturbing Roots Excessively
It’s important to loosen tangled roots, but handling them too roughly can cause unnecessary stress or damage. Be gentle when teasing out roots and avoid pulling or breaking them whenever possible.
Watering Mistakes After Repotting
Either neglecting to water right after repotting or overwatering are both harmful. Water thoroughly after repotting, then allow the soil to dry out slightly before watering again—monitor moisture levels closely for the first few weeks.
Ignoring Plant Acclimation
Some folks immediately place their freshly repotted plants back into direct sunlight or change their location drastically. Plants need time to acclimate; keep them in indirect light and avoid sudden changes in temperature until they recover from the move.
In Summary
Avoiding these common mistakes will help ensure your indoor plants stay happy and healthy throughout the repotting process, setting them up for strong growth and vibrant foliage in their new home.


