Choosing the Right Indoor Plants for Propagation
If you want to start propagating indoor plants, selecting the right varieties is your first and most important step. Not all houseplants are equally easy to multiply, so focusing on those that root quickly and thrive indoors will give you the best results, especially in American homes where temperature and lighting can vary. Popular choices like pothos, spider plants, snake plants, and philodendrons are ideal for beginners because they tolerate a range of conditions and respond well to simple propagation methods. Look for healthy “mother” plants with strong stems and vibrant leaves—these will provide the best cuttings or divisions. Consider your home’s light availability: if your windows let in plenty of bright, indirect sunlight, succulents or tradescantia are great options; if not, try low-light tolerant varieties like ZZ plant or peace lily. Also, think about your lifestyle—if you prefer low-maintenance greenery, opt for hardy types that don’t need constant attention. By choosing easy-to-propagate plants that fit your living space and routine, you’ll set yourself up for propagation success right from the start.
Gathering Essential Tools and Supplies
Before you start propagating your favorite indoor plants, it’s important to gather the right tools and supplies. Having everything on hand not only streamlines the process but also increases your chances of successful propagation. Here’s a practical rundown of what you’ll need to get started.
Common Propagation Tools
| Tool | Purpose |
|---|---|
| Sharp Scissors or Pruning Shears | For making clean cuts on stems or leaves without damaging the plant |
| Clean Knife | Useful for dividing roots or cutting thicker stems |
| Tweezers | To handle delicate cuttings, especially small seeds or succulents |
| Spray Bottle | For misting cuttings and keeping humidity levels up |
Choosing Containers for Propagation
You don’t need anything fancy—often, items from around your home will work perfectly. Here are some container options:
- Small pots with drainage holes (plastic or clay)
- Clear glass jars or cups (ideal for water propagation so you can monitor root growth)
- Seedling trays (helpful for starting multiple cuttings at once)
Selecting Growing Mediums
The right growing medium depends on your plant type and method. Here are some popular choices:
| Growing Medium | Best For |
|---|---|
| Potting Mix | Most stem and leaf cuttings; provides nutrients and good drainage |
| Sphagnum Moss | Aroids like pothos and philodendron; retains moisture while allowing airflow |
| Perlite or Vermiculite | Cuts down on rot risk; excellent for succulents and cacti propagation |
| Water Only | Pothos, spider plants, tradescantia; lets you watch roots develop before potting up in soil |
A Few Extras Worth Having On Hand
- Rooting hormone (optional, but boosts root formation for some species)
- Plastic bags or humidity domes (to create a mini-greenhouse effect over your cuttings)
Tip from the Garden: Cleanliness Counts!
No matter which tools or containers you use, always sterilize them before use. This prevents the spread of diseases and gives your new plants their best shot at thriving indoors.
3. Step-by-Step Methods: Cuttings, Division, and Leaf Propagation
If you want to multiply your favorite houseplants, there are three tried-and-true methods that work well for indoor gardeners: cuttings, division, and leaf propagation. Here’s a clear breakdown of how to use each technique, so you can grow your plant family with confidence.
Cuttings
Stem Cuttings
This is the most popular method for many common indoor plants like pothos, philodendrons, and monsteras. Choose a healthy stem with at least one node (the bump where leaves or roots grow). Using clean scissors or pruning shears, snip just below the node. Remove any lower leaves to prevent rot. Place the cutting in a jar of water or moist potting mix—make sure the node is submerged or buried. Keep it in bright, indirect light and change the water every few days if rooting in water. Roots usually appear within 2-4 weeks.
Tip Cuttings
For vining plants or herbs like mint, snip off a fresh tip with several leaves attached. Treat as above for stem cuttings.
Division
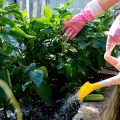
This method works best for plants that naturally grow in clumps, such as snake plants, peace lilies, and spider plants. Gently remove the plant from its pot and shake off excess soil. Use your hands or a clean knife to separate sections of the root ball, making sure each section has both roots and leaves. Replant each division into its own pot with fresh soil and water thoroughly.
Leaf Propagation
Certain plants like succulents (e.g., jade plant) and African violets can be propagated from just a single leaf. For succulents, twist off a healthy leaf and let it dry out for a day or two until the end calluses over—this helps prevent rotting. Place the callused leaf on top of moist succulent soil; new roots and tiny plants will start to emerge from the base after a couple of weeks. For African violets, snip a mature leaf with a short stem and insert it into moist soil at an angle.
Pro Tip:
No matter which method you choose, patience is key! Indoor conditions vary by home and season, so don’t worry if roots take longer than expected to form. Keep your propagations warm (around 70°F), humid (a plastic bag tent works wonders), and out of direct sun for best results.
4. Care Tips for Propagated Plants
Once your cuttings have started to root, giving them the right care is crucial for a successful transition from water or soil propagation to thriving houseplants. Here’s how you can help your newly propagated plants settle in and develop strong roots:
Watering Guidelines
Overwatering is one of the most common mistakes with propagated plants. Newly rooted cuttings are especially prone to rot if kept too wet. Check moisture by gently pressing your finger into the top inch of soil—only water when it feels dry. If propagating in water, change the water every 3-5 days to prevent bacteria buildup.
| Propagation Method | Watering Frequency | Best Practice |
|---|---|---|
| Soil | Every 5-7 days (or when top inch dries) | Use a spray bottle for gentle moisture; avoid soggy soil. |
| Water | Change water every 3-5 days | Rinse container and roots; use room-temperature water. |
Light Requirements
Bright, indirect sunlight is ideal for most propagated indoor plants. Direct sun can scorch delicate new leaves and roots, while low light can slow down root development. Place your cuttings near an east- or north-facing window, or use sheer curtains to diffuse harsher rays.
Recommended Light Levels for Common Houseplants:
| Plant Type | Optimal Light Exposure |
|---|---|
| Pothos, Philodendron | Medium to bright indirect light |
| Spider Plant, Snake Plant | Low to medium indirect light |
| Monstera, Fiddle Leaf Fig | Bright indirect light only; avoid direct midday sun |
Environmental Conditions for Acclimation
The environment plays a big role in helping propagated plants adjust. Humidity levels of 50% or higher are ideal—especially for tropical varieties. If your home is dry, group plants together or use a tray with pebbles and water underneath their pots. Keep temperatures steady between 65°F and 75°F (18°C–24°C) and avoid drafts from windows or air conditioners.
Pro Tip:
If your plant’s leaves droop or yellow, it may need more humidity or less direct sun during acclimation. Don’t fertilize until you see active new growth—roots need time to establish before handling extra nutrients.
With patience and attention to these basic needs, your propagated houseplants will reward you with lush, healthy growth!
5. Troubleshooting Common Propagation Problems
Even the greenest thumbs run into a few bumps when propagating indoor plants. But don’t let setbacks discourage you—most issues have simple solutions. Here’s how to tackle the most common propagation problems with confidence and keep your plant babies thriving.
Dealing with Rot
If your cuttings turn mushy or black at the base, you’re likely dealing with rot—a common problem caused by excess moisture or poor air circulation. To prevent this, always use clean, sharp tools and sterilized containers. Make sure your potting mix drains well; avoid letting water sit around the base of the cutting. If rot does appear, snip off affected areas above the damage and let the cutting dry out for a day before replanting in fresh soil or water.
Handling Slow Growth
Propagation takes patience, but if your cuttings seem stuck for weeks, check their environment. Most indoor plants root best in bright, indirect light and temperatures between 65–75°F (18–24°C). Avoid direct sun, which can scorch tender leaves. If you’re propagating in water, refresh it every few days to keep oxygen levels up. Sometimes adding a little rooting hormone can speed things along—just follow package directions.
Combatting Wilting
Wilting is usually a sign that your cutting isn’t absorbing enough moisture or has lost too many leaves. Make sure at least one node (where roots will grow) is submerged in water or buried in soil. Trim away excess foliage to reduce stress on the cutting. For soil propagation, cover your container loosely with a plastic bag to boost humidity—but don’t seal it completely, as airflow is still important.
Keep a Can-Do Attitude!
No matter what challenges pop up, remember: propagation is part science, part art—and every attempt brings you closer to success. Pay attention to what works for your space and plant types. With a little observation and adjustment, you’ll soon be multiplying your favorite indoor plants like a pro.
6. Transplanting and Long-Term Care
Best Practices for Potting Up Newly Propagated Plants
Once your propagated cuttings have developed strong roots, it’s time to transplant them into their own pots. Choose a pot that’s just slightly larger than the root ball—too much space can lead to overwatering issues. Make sure the pot has drainage holes; excess water is a leading cause of root rot in indoor plants. Use a high-quality, well-draining potting mix tailored to your plant type (for example, cactus soil for succulents or peat-based mixes for most tropicals). Gently remove your cutting from its propagation medium, taking care not to damage the delicate new roots. Place it in the center of the new pot, fill around with fresh soil, and press lightly to secure. Water thoroughly until water drains out the bottom, then let the top inch of soil dry before watering again.
Getting Your Plants Settled Indoors
After transplanting, keep your new plants in a warm spot with bright but indirect sunlight. Avoid direct sun right away, as young roots are sensitive and can stress easily. Maintain steady humidity—grouping plants together or using a small humidifier can help if your home air is dry. Avoid fertilizing right after transplanting; wait about four weeks so roots can recover and settle in. Watch for signs of shock like drooping or yellowing leaves—most will bounce back with consistent care.
Long-Term Indoor Plant Care Tips
To keep your propagated plants healthy over the long term, stick to a regular watering schedule based on each plant’s needs—overwatering is more harmful than underwatering for most houseplants. Rotate your pots every few weeks so all sides get equal light and growth stays even. Wipe leaves occasionally with a damp cloth to remove dust and help them breathe. Fertilize lightly during active growing seasons (spring and summer) with a balanced liquid fertilizer diluted to half strength. Finally, be patient: some species grow fast while others take their sweet time indoors. With attentive care and observation, your new plant babies will thrive and bring fresh life to your home year-round.