1. Why Grow from Seed?
Starting your garden from seed is a rewarding and budget-friendly way to dive into gardening, especially for beginners. Instead of buying established plants from a nursery, growing from seed offers several unique benefits that can make your gardening experience even more enjoyable.
Cost Savings
One of the biggest advantages of growing from seed is the cost. A single packet of seeds often costs less than one potted plant and contains enough seeds to grow multiple plants. This makes it an economical choice for gardeners looking to fill a large space or experiment with different varieties without breaking the bank.
Example Cost Comparison
| Item | Average Cost | Plants You Can Grow |
|---|---|---|
| Tomato Seed Packet | $2–$4 | 20–50+ plants |
| Potted Tomato Plant | $3–$6 each | 1 plant |
As you can see, starting from seeds stretches your gardening dollars much further.
Greater Variety
When you shop for plants at a garden center, you’re limited to what they have in stock. But when you grow from seed, especially if you order online or from seed catalogs, your options expand dramatically. You’ll find heirloom varieties, unique colors, and plants specially suited to your local climate or personal taste.
Types of Varieties Available When Growing From Seed:
- Heirloom tomatoes in colors like purple, yellow, and striped
- Lettuce mixes with red, green, frilly, and smooth leaves
- Zinnias in rare shades like lime green and coral
This variety lets you customize your garden and discover new favorites each season.
Satisfaction and Learning Experience
Watching a tiny seed sprout and grow into a thriving plant is deeply satisfying. It connects you to nature and gives you a sense of accomplishment that’s hard to match. For beginners, its also an incredible learning opportunity — youll gain firsthand knowledge about plant life cycles, soil health, watering needs, and sunlight requirements.
The process may take time and patience, but many gardeners find it relaxing and fulfilling. Plus, caring for plants from their earliest days helps build confidence and skills that will benefit you as your gardening journey continues.
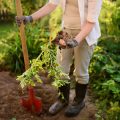
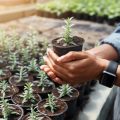
2. Essential Tools and Supplies
If youre just starting your journey from seed to harvest, having the right tools and supplies can make a big difference. Whether youre planting indoors on a windowsill or outdoors in your backyard, here are some must-haves to help your seeds grow strong and healthy.
Basic Seed Starting Supplies
You don’t need a ton of fancy equipment to get started, but a few simple items will set you up for success. Here’s a breakdown of the essential tools:
| Item | Description |
|---|---|
| Seed Trays or Starter Pots | These hold your soil and seeds. You can use plastic trays, biodegradable pots, or even recycled containers like egg cartons. |
| High-Quality Potting Mix | A light, well-draining mix designed for seed starting. Avoid using regular garden soil—it’s too heavy and may contain pests or diseases. |
| Grow Lights (for indoor starts) | If you don’t have a sunny window, fluorescent or LED grow lights will give your seedlings the light they need to thrive indoors. |
| Spray Bottle or Watering Can | A gentle spray keeps the soil moist without washing away tiny seeds. A small watering can with a fine spout also works well. |
| Humidity Dome or Plastic Wrap | Covers to trap moisture and warmth, helping seeds germinate faster. Remove once seedlings appear to prevent mold. |
| Labels or Plant Markers | Easily keep track of what you’ve planted and when. Popsicle sticks or masking tape work great too! |
Optional but Helpful Extras
- Heat Mat: Keeps soil warm for better germination, especially useful for heat-loving plants like tomatoes and peppers.
- Trowel: Handy for filling pots or transplanting seedlings into larger containers or the garden.
- Tweezers: Makes it easier to handle very small seeds without damaging them.
A Quick Tip for Beginners
If youre unsure where to start, consider picking up a beginner seed-starting kit from your local garden center or online. These often include trays, soil pellets, and instructions—all in one box!
![]()
3. Easiest Vegetables to Grow from Seed
If youre new to gardening and want a smooth start, choosing vegetables that are easy to grow from seed is the way to go. These plants not only sprout quickly but also require minimal care, making them perfect for beginners. Heres a look at some of the top beginner-friendly veggies you can sow directly into your garden soil or containers.
Radishes
Radishes are one of the fastest-growing vegetables you can plant. They can be ready to harvest in as little as 3 to 4 weeks after planting. Radish seeds germinate quickly, even in cooler soil, making them ideal for spring and fall gardens.
Quick Tips:
- Plant in full sun for best results
- Thin seedlings early for proper root development
- Harvest promptly for best flavor
Lettuce
Lettuce grows well in cooler weather and comes in many varieties like romaine, butterhead, and leaf lettuce. Its perfect for growing in garden beds, raised beds, or even window boxes.
Quick Tips:
- Sow seeds every couple of weeks for a continuous harvest
- Keeps growing even if you snip off just the outer leaves
- Prefers partial shade in hotter climates
Green Beans
If youre looking for something productive and satisfying, green beans are a great pick. Whether bush or pole type, they grow fast and yield plenty with very little fuss.
Quick Tips:
- Sow seeds directly in warm soil after the last frost
- Bush beans need less space; pole beans need support to climb
- Picks keep coming if you harvest regularly
Zucchini
Zucchini is known for its high yields and fast growth. One plant can produce more than enough for a small family, making it a rewarding choice for first-time gardeners.
Quick Tips:
- Sow seeds directly into garden soil after frost danger has passed
- Loves sunny spots and rich, well-drained soil
- Pick when young and tender for best taste
Beginner-Friendly Vegetable Comparison Chart
| Vegetable | Days to Germinate | Days to Harvest | Sowing Season | Main Care Tips |
|---|---|---|---|---|
| Radish | 3–7 days | 21–30 days | Spring/Fall | Thin seedlings early; water consistently |
| Lettuce | 7–10 days | 30–60 days (varies by type) | Spring/Fall (or year-round in mild climates) | Sow successively; avoid heat stress |
| Green Beans (Bush) | 7–10 days | 50–60 days | Late Spring/Summer (after frost) | No need to stake; pick often to encourage more beans |
| Zucchini | 5–10 days | 45–55 days after sprouting | Late Spring/Summer (after frost) | Avoid overhead watering; harvest young fruits often |
Selecting these vegetables gives you a great chance at a successful first garden. Theyre forgiving, quick to grow, and give you that satisfying “I grew this!” feeling faster than many other crops.
4. Herbs That Thrive from Seed
If youre new to gardening and want to enjoy fresh flavors straight from your backyard or windowsill, growing herbs from seed is a great place to start. Many popular culinary herbs are not only easy to grow but also quick to harvest, making them perfect for beginners. Let’s look at a few tried-and-true herbs that thrive when grown from seed in American home gardens.
Basil
Basil is one of the most rewarding herbs to grow from seed. It germinates quickly and flourishes in warm weather, making it ideal for summer gardens. Whether you’re making pesto or adding a burst of flavor to pasta and salads, fresh basil is a must-have in any kitchen garden.
Growing Tips:
- Start seeds indoors 4-6 weeks before the last frost date or sow directly outdoors after danger of frost has passed.
- Provide full sun and well-drained soil.
- Pinch off flower buds to encourage more leaf growth.
Cilantro
Cilantro grows fast and prefers cooler temperatures, making it perfect for spring and fall planting. Both its leaves (cilantro) and seeds (coriander) are used in cooking, giving you double the value from one plant.
Growing Tips:
- Sow seeds directly into the ground or containers as cilantro does not transplant well.
- Select a spot with full sun to partial shade.
- Harvest leaves early; once it bolts (flowers), the flavor becomes more bitter.
Dill
Dill is another beginner-friendly herb that grows easily from seed. Its feathery leaves and distinctive aroma make it a favorite in pickles, salads, and fish dishes. Like cilantro, dill thrives in cooler seasons.
Growing Tips:
- Sow directly into the soil after the last frost; avoid transplanting as roots are delicate.
- Dill prefers full sun and well-draining soil.
- You can harvest both the leaves (dill weed) and seeds (dill seed) for different uses in the kitchen.
Quick Comparison Table
| Herb | Best Time to Plant | Sowing Method | Main Uses |
|---|---|---|---|
| Basil | Spring/Summer | Indoor or Direct Sow | Pasta, Salads, Pesto |
| Cilantro | Spring/Fall | Direct Sow Only | Salsas, Curries, Garnish |
| Dill | Spring/Fall | Direct Sow Only | Pickling, Fish Dishes, Salads |
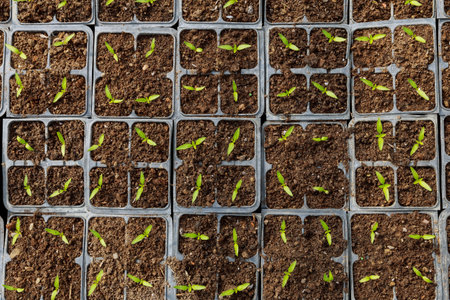
5. Tips for Successful Germination and Growth
Starting plants from seed is rewarding, but getting them to sprout and thrive takes a little know-how. Here are some simple, effective tips to help your beginner-friendly plants grow strong from the start.
Control Moisture Carefully
Seeds need consistent moisture to germinate, but too much water can cause rot or mold. Keep the soil damp like a wrung-out sponge—moist but not soggy. A spray bottle is perfect for gently misting the soil surface without disturbing the seeds.
Provide Proper Light
Most seedlings need plenty of light once they sprout. A sunny windowsill that gets at least 6 hours of sunlight works well. If natural light is limited, consider using a grow light placed a few inches above the seedlings to prevent them from becoming leggy and weak.
Time Your Planting with Your USDA Hardiness Zone
Planting at the right time is key for success. The USDA Hardiness Zone map helps you figure out when to start seeds indoors or outdoors based on your local climate. Use the table below as a general guideline:
| USDA Zone | Start Seeds Indoors | Transplant Outdoors |
|---|---|---|
| Zone 3-4 | Late March – Early April | Late May – Early June |
| Zone 5-6 | Mid March – Early April | Mid May |
| Zone 7-8 | Early March | Mid April – Early May |
| Zone 9-10 | February – Early March | Late March – Early April |
Keep Temperatures Consistent
Seeds usually germinate best between 65°F and 75°F. If your home runs cool, consider using a seedling heat mat under your trays to keep the soil warm enough for sprouting.
Use Quality Seed-Starting Mix
A lightweight seed-starting mix gives seeds the best chance to grow roots easily and stay healthy. Avoid garden soil, which can be too dense and may contain pests or diseases.
Label Everything!
If youre planting several types of seeds, label each container clearly. It’s easy to forget what you planted where, especially before anything sprouts.
Be Patient and Observe Daily
Some seeds sprout in just a few days; others take weeks. Check daily for moisture and signs of growth, and adjust light or water as needed.
6. When and How to Harvest Your Plants
Knowing the right time to harvest your plants is just as important as planting them correctly. Harvesting too early can mean missing out on full flavor, while harvesting too late can result in overripe or tough produce. Here’s how to tell when your beginner-friendly crops are ready, and tips for harvesting them to keep your garden productive all season long.
Understanding Harvest Timing
Different plants have different signs that indicate they’re ready to be picked. The key is to observe changes in size, color, texture, and smell. Below is a quick reference guide for some easy-to-grow crops:
| Plant | Harvest Signs | Best Time to Harvest |
|---|---|---|
| Lettuce | Leaves are full-sized but still tender | Early morning before leaves wilt from sun |
| Radishes | Tops of roots visible above soil; about 1 inch across | As soon as they reach size; don’t let them get woody |
| Zucchini | 6–8 inches long; skin glossy and tender | Check daily; harvest often to encourage more fruit |
| Green Beans | Smooth pods that snap easily, seeds not bulging | Every couple of days during peak production |
| Tomatoes | Fully colored and slightly soft to touch | When fully ripe on the vine for best flavor |
Tips for Harvesting Successfully
Use Clean Tools
Always use clean scissors or garden shears when cutting fruits or vegetables off the plant. This helps prevent the spread of disease.
Handle Gently
Avoid squeezing or dropping produce. Many fruits and veggies bruise easily, which can cause them to spoil faster.
Harvest Regularly
Picking crops regularly encourages plants to produce more. For example, the more you pick zucchini and beans, the more you’ll get!
Morning is Best
If possible, harvest early in the day when temperatures are cooler. This helps preserve freshness and reduces plant stress.
Storing Your Harvest
Once harvested, proper storage is key to keeping your crops fresh:
- Lettuce: Rinse gently, dry with paper towels, and store in a breathable container in the fridge.
- Zucchini & Radishes: Keep in a perforated plastic bag in the crisper drawer.
- Green Beans: Store unwashed in a reusable produce bag or container.
- Tomatoes: Keep at room temperature away from direct sunlight until fully ripe; refrigerate only if necessary.
By learning what signs to look for and using good harvesting practices, youll enjoy fresher flavors and keep your garden producing longer throughout the growing season.